Yodiz offers highly flexible Epic board which includes various prominent functionalities to manage complex features.You can use this board to manage an epic which is large enough to be expanded over the entire project and even each part of it is implemented by different teams.
Epic Board is single place where you can add, monitor and update progress of epics. Each organisation follows different ways to keep track of their features, some track everything within one project while others have to keep epics above projects sturcture and then divide it further into different project teams. Epic board, gives both options by providing Global Epics and Project level Epics.
To access Epics board, select Epics from Navigation menu.
1. Create an Epic
You can create two types of Epic:
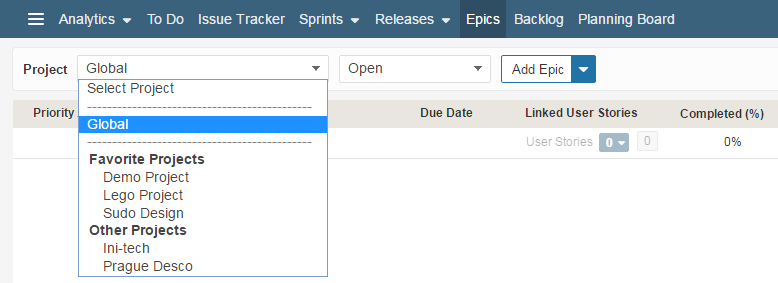
Project level epic – An epic that is accessible within that project only. It is used to define features of one specific project. With such epic, you can associate only user stories of the same project. To create such epic, select Project name from Project list and then add an epic.
Global Epic – An epic that is not “single project bound” and feature description is divided among different projects of your company. Items under such epic can be associated with different projects. Global Epics can only be created via Epic- Add with Details. Follow the screenshot below for navigation of Global Epic:

An Epic can be created by Quick Add and Add with Detail methods.
Quick Add: lets you create an epic with minimal details. It is accessible in only one project, where it is created.
Add with Detail: lets you add project level and global epic with all details.
2. Associate User Stories
User Stories can be associated with Epic in Listing, Popup and Detailed view.
2.1 Add New User Story
On Epic board, click on the highlighted icon in order to associate User Story with the selected Epic on the go.

You can also add new user story from Epic popup and detailed view.
2.2 Add Existing User Story
You can add existing User Stories using popup or detailed view.
- Click on Epic ID in Epics board and open the popup view. Or
- Click on the ellipses icon at far right of the selected Epic > View Details
- Select User Stories tab. You can add new User Story in the Epic and can associate existing User Stories with Epic.

3. Add Issue and Task
There is no direct association of an issue and task with epic. You can add issue and task under User Story of an epic. To add an Issue or Task for a User Story, Click on respective icon available under each User Story.

To directly associate and refer an Issue with an epic, you can use custom fields workaround.
4. Monitor Epic Progress
Epic progress can be measured by two terms: User Story completion and effort count of associated Issues and Tasks.
4.1 Completion of Epic User Stories
Completion of Epic is measured by number/percentage of User Stories are complete and are in Done category. You can see epic progress under “Completed (%)” column.

An Epic is completed when you set its status to “Implemented”.
Note: Check your “status set” settings to see which status is under Done category.
4.2 Issue and Task Effort Count
Yodiz offers enhanced functionality to easily view effort count of Items associated with Epic’s User Story. The following highlighted counters show Cumulative User Story Estimates, Task & Issue Cumulative Estimate, Effort Left and Effort Spent respectively.

5. View Epic Associations
Epic is a complete feature which can have direct association with only User Stories and indirect association with Tasks and Issues. Let’s discuss Epic Associations.
5.1 Epic association with User Story
An epic can contain one or many User Stories. Epic has direct association with User Story as single or numerous User Stories make a complete Epic. The associated User Stories might or might not be part of a Sprint and Release.
Click on User Story blue counter under Linked User Story column to see details of associated user stories on Epics board.
5.2 Epic association with Issues and Tasks
An epic has indirect association with Issues and Tasks. A User Story of the epic should be associated with underlying tasks and issues. You can see list of associated tasks and issues by locating respective User Story and clicking on contextual icons of Issue and Tasks.

5.3 Monitor Epic Association In Backlog
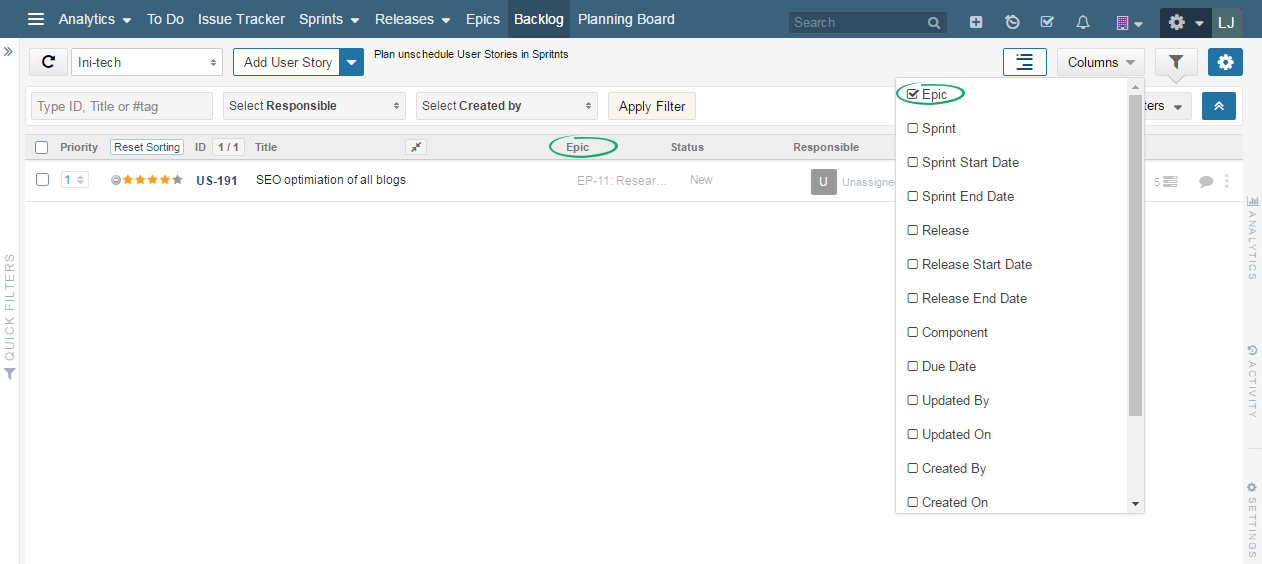
You can enable Epic Column in Backlog to see individual User Story associated with which Epic. In order to do so, go to Backlog board and click on the Column drop down.

Click on the checkbox of Epic in order to view the associated Epics. You can view the Unscheduled, Sprint associated and completed User Stories using Backlog filter on left Add User Story drop down.
6. Prioritize Your Epics
On an Epic board, epics are listed on its creation date order, by default. You can still change this priority order by simply drag and drop on the list. This priority order does not impact on the value or importance of an epic but helps users to monitor required epics at the top of the list.
Priority Column is located at left most side of epic board. Clicking on Priority column will change sorting to ascending or descending.
7. Apply Filters
You can apply Filters on Epics to narrow down your focus on contents. Click on the ![]() filter icon. Search can be performed on many criteria’s, you can search by Item Responsible, Creator, ID, Tag or Title.
filter icon. Search can be performed on many criteria’s, you can search by Item Responsible, Creator, ID, Tag or Title.
You can also save and reset the applied filters.
8. Export Epic
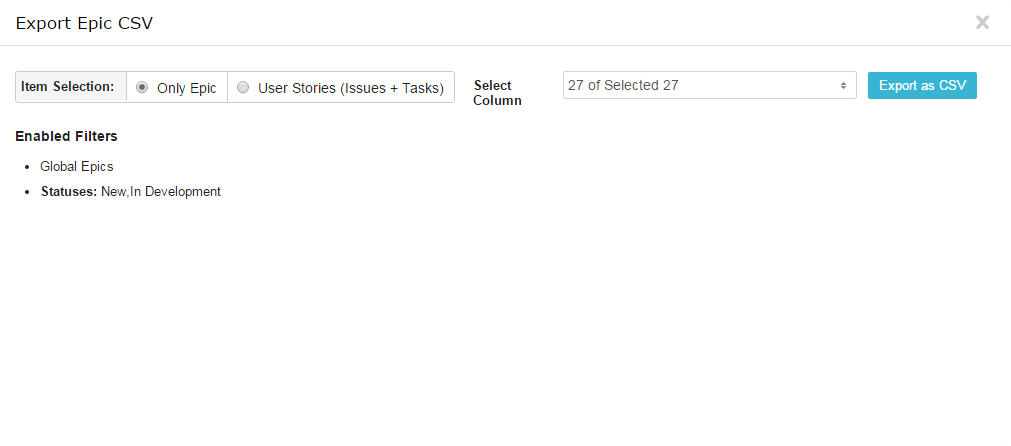
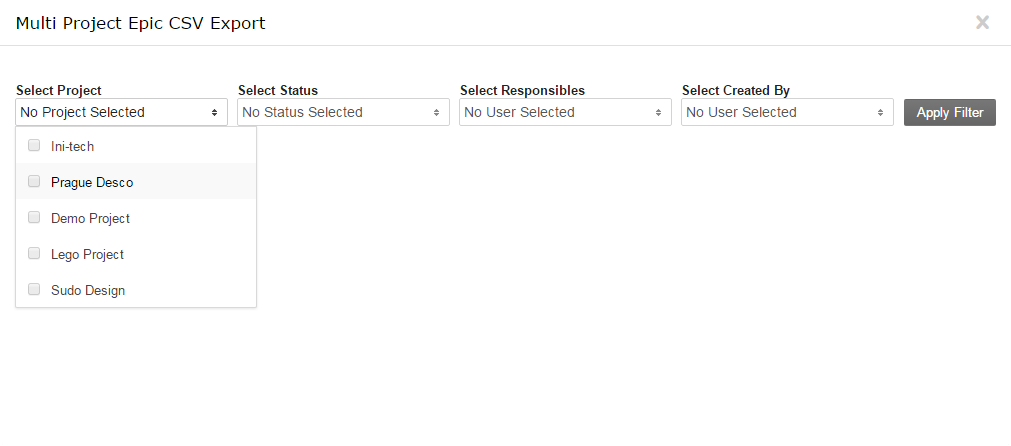
You can Export Epics by clicking on the settings icon provided on the Epic Board at right side under navigation menu.
- Export as CSV: All Epics in all projects will be exported with this option however you can choose whether you want to export only Epics but associated Issues and User Stories too.
- Export CSV By Projects: You can filter your desired data from multiple projects and export only the selected content.


9. Epic Progress chart
You can access Epic associated Charts and Graphs through this navigation.
You can learn more about it in Epic Progress Chart help article.
10. Default Fields of Epic
Some Fields are default in Epic. Following is the brief description of these Fields.
| Fields | Description |
|---|---|
| ID | It’s a system generated unique identifier that is assigned to each Epic. The ID consists of two parts, the pre-fix “EP-” and a unique number, e.g. “EP-123”. ID is auto-generated by system in sequential order. When a Epic is deleted, sequence number increments by 1 everytime a new Epic is created. |
| Title | The Title can be up to 256 characters and is limited to plain text only. Title helps to write the purpose of the Epic. |
| Description | All the detailed requirements of Epic go in the description. Most importantly, you can describe Acceptance Criteria. It includes any other information that is required to get this Epic implemented. |
| Status | Status helps in tracking the progress of each item. Status titles depend upon the Status Set associated with the selected project. There are generally three categories “New”, “In Development” and “Implemented”. You can customize Status Set fields as well, Click here to learn more about it. |
| Responsible | It is the assigned User who is responsible for working on the Epic. Only project members can be assigned Responsible for Epic for the Project associated Epics. However, if Epic moves from one project to another in which the same user is not added, still the same responsible will be shown. In case any editing is done, the value of responsible becomes nil as the assigned responsible is not a User in the other project. To resolve this issue, add the desired user as new user to the other project. If user exists in other project as well then system will retain the responsible. |
| Created Date | It is “read only” value for date and time of Epic creation. The time is automatically customized according to the selected Time Zone. |
| Tags | Tags can help in identifying Epics. All the tags are “hyperlinked” on all the boards thus clicking on tags will filter the whole board or backlog. There are two types of tags “Standard Tags” and “Special Tags”. Common Tags are generated as you type, you can select the tag from drop down suggestions if it already exists. While the Special Tags are defined by the Super Admin of the company. For example If a “CSS Special Tag” is already created as Special Tag, it is advisable to use that “CSS Special Tag” wherever required. Any Common Tag can be converted into Special Tag. |
| Epic Due Date | Due Date basically specifies the end date of a Epic. If no Due Date is selected, a calendar icon will be shown. If the Epic is overdue, expired Due Date will be shown in red color. The color of Due Date will be green if it is under due. |
| Comments | Comments can be added into a Epic. Responsible Users will get email notifications and also in-app notifications regarding comments automatically. You can tag any other user in the comments field using “@name” or alternatively click on the user icon from drop down which will appear if you write few letters of the desired user name. You can attach text and images into the comments. Moreover attachments from Dropbox, Box and Google Drive are also supported. You can use “Markdown” editor to add rich text in the comments. Comments can be edited or deleted. |
| Attachments | Files from various sources (local drive, Dropbox, Google Drive and Box) can be attached to Epic. |
| History | Any updates or changes in the Epic are logged in History panel of each Epic. History option can be found in both Detailed and Popup view. |
| User Stories | User Stories associated with Epic. |
| Timeline | Timeline shows the Status progression of Epic in reference to time and date. |
| Plan Estimate | Complete estimation of Epic completion in Points. |
| Dependency | An Epic can be dependent on another item. It can not be marked complete unless the other dependant item is completed. Following are the dependencies.
|
| Custom Fields | Custom Fields can be created for Epic. The Custom Fields data type range from Plain Text Field to Sprint, Release, Epic and much more. Custom Fields allow maximum customization. |
Could not find what you were looking for? Check out our Frequently Asked Questions
