Clear vision and right focus on prioritized work items is the key to successful delivery of a project. To understand project requirements, put them in form of User Stories, and prioritizing at right time are the critical steps that leads a team to victory. Yodiz Backlog board supports you to plan, assess, groom project backlog and fetch relevant information quickly.
1. Assess Project with One Click
Comprehend your work by looking at: what is achieved, what work is ongoing and what is coming up. To do so, Backlog Board provides you few additional built-in filters of User Stories. Use this Drop down  under main navigation, to see work items according to your selection on the right side of drop down. The counter on the left shows you total number of stories and Sum of estimates.
There are 4 main groupings of User Stories in Backlog.
- Unscheduled: User Stories that are neither Done nor in a Sprint
- In Sprint: All User Stories which are in Sprint and their status is not in Done Category.
- Done: User Stories with the Status Set of Done Category. It counts all Done User Stories irrespective of, if they are part of a Sprint or not.
- All: User Stories from all above groups.
2. Plan your Sprints
Yodiz Backlog is compact and its Sprint Planning section consolidates to plan your work easily. You can use the Sprint Planning section of Backlog board to plan your unscheduled User Stories in current Sprints.
Once you select Unscheduled from this Drop down under main navigation, a Sprint Planning button will appear on the right side under main navigation. Clicking on this button will open the Sprint Planning.
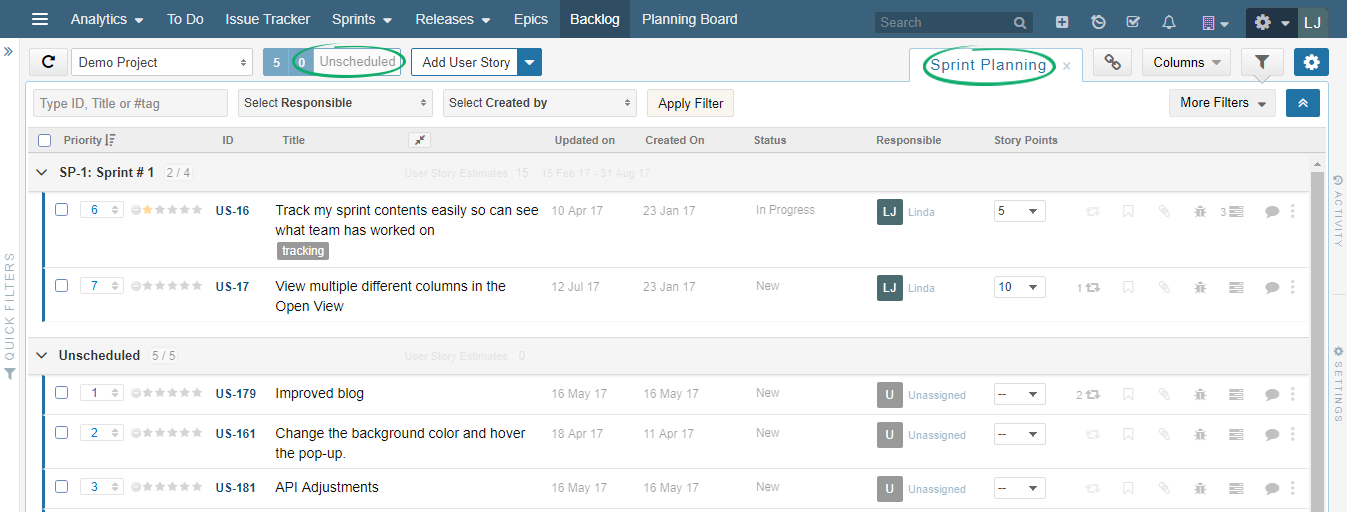
You can use the drag and drop feature of Backlog board to freely drop your unscheduled User Stories in available Sprints.
Note: All the Active and Upcoming Sprints (end date still not passed) will be listed and you can drag Backlog unscheduled User Stories to a Sprint. Item Priority is automatically adjusted depending on the dropping position.
3. Prioritize Your Work
Prioritization is one of the main features of Backlog. Yodiz offers two types of priorities; star priority and number priority. You can use both priorities at the same time. Star Priority is although optional and its settings can be changed in Backlog settings.
3.1 Star Priority
Yodiz offers star priority of items in order to maintain the focus of your Backlog Items. Star priority ![]() has 6 rankings which are explained below:
has 6 rankings which are explained below:
- 5 Stars
 : Business Critical
 - 4 Stars
 : High Priority
 - 3 Stars
 : Important
 - 2 Stars
 : Low Priority
 - 1 Star
 : Nice To Have
 - No Star
 : No Priority
Tip: You can also customize your User Story priority name. For example change “Business Critical” to “Must Have”. In order to do so, go to navigation menu Settings Icon > Administration > Configuration > Manage Priority Labels.
You can prioritize the most important Items using the star priority. The Items with highest star priority are shown at the top. Also, drag and drop functionality can be used to change position and priority of Items. When you drop any Item, its priority will be updated as per the priority of Item right above it. If Item is dropped at the top, its will be assigned a 5 star priority automatically. Clicking on  beside stars, disables star priority option only for that item.
Note: Star priority can also be disabled from the Backlog settings. In order to do so go to Backlog > Right Navigation Panel > Backlog Settings > Priority Settings.
Unchecking Use Priority option, will disable the star priority option from Project User Stories and disappears from Backlog board as well. In settings, select number of yellow stars, to define default star priority of a new user story.
3.2 Number Priority
This priority is the default priority setting and cannot be disabled. It is the editable sequential number provided at the left side of each Item under Priority column in Backlog. Backlog automatically adjusts priority number, if you set priority number of an item that is same as of another item in Backlog. It is valuable to use with Star priority as well. For example, If you want to move a particular Item to top or you have many items with same star priority level.

The last item in backlog will jump to top of the list, if you set its number priority to 1.
4. Drag and Drop
Yodiz Backlog is all about prioritizing your work so you are aware of your immediate focus.
Drag & drop functionality comes in handy when you want to manage your Backlog Items. User Stories in the Backlog can easily be dragged and dropped vertically to “change the position sequence or star priority”. The User Stories with higher Star Priority will automatically be shown at the top of list.
Note: Drag and drop only works when User Story Filter is “Unscheduled”.
Multiple Items can also be dragged and dropped by selecting them via the checkbox provided at the left side of every Item in Backlog. Furthermore, any Bulk Edit action can be applied to dropped items which is very useful when you want to edit multiple Items at once. Changing Number Priority is another way to move items position.
5. Add User Stories
Add User Stories in Backlog by using  dropdown, located on top of Backlog Filter bar. You have choice to add User Stories faster by putting only essential information using Quick Add or by giving details of User Story.
6. Estimate User Story Size
User Story size helps team and product owner to realize that how much work is needed for getting complete that work. If user story size is too large in Product Backlog then it may need to divide into smaller user stories while planning Sprint.
You can add User Story size by using Story Points  dropdown. Story Points units are set in your Project settings and you can modify them in your project settings.
7. Customize your Backlog
Backlog is very flexible work board. We understand that your company requirements might be more than what default views can accommodate, that’s why you can further customize your Backlog board. Following are the ways to do so.
7.1 Add Columns On Board
Design your Backlog board by adding or removing columns on the board. You can add existing fields as columns in your Backlog using the Columns options provided below the navigation menu on the right side. Add desired columns for instance if you need to see Due Date information of each Item. You can sort your Items based on the newly added column e.g., Due Date. To sort by any column, click on the column heading. To change sorting to default, a “Resort Ordering” option automatically appears besides Priority Column. Use it to sort items by Priority.
7.2 Add Custom Field As Column
In addition to built-in system fields, Yodiz Backlog lets you add a variety of different field types as columns for example, text, dropdown, date, multiselect and url etc.You can add these custom fields as columns in Backlog. In order to add new custom fields, go to navigation menu Settings Icon > Administration > Configuration > Create Custom Fields.
Note: To use a custom field, associate it with your project Item Screen
- To use this custom field in Backlog, Go to navigation menu Settings Icon > Administration > Configuration> Manage Custom Screens.
- Add this Custom Fields in your Project User Story screen.
- It will appear as an option in the “Columns” drop-down of Backlog board as well.
- Mark the custom field to add it as a column in your Backlog board. You can sort custom field values in backlog column as well.
7.3 Hide and Unhide Columns
Priority, User Story ID and Title are three main attributes that you want to know about your backlog items. Now, you can hide/unhide additional information by simply clicking on this icon ![]() available on column header besides Title column.
available on column header besides Title column.
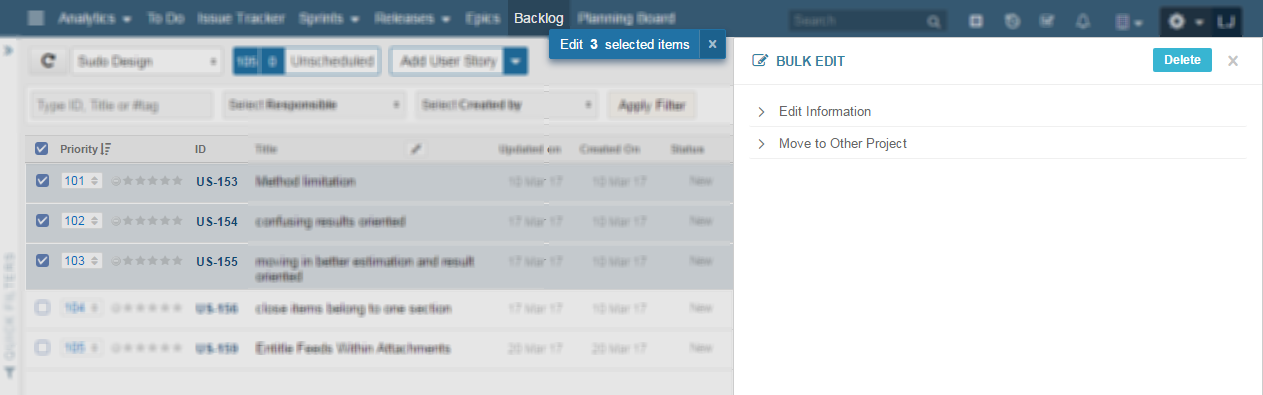
8. Use Bulk Actions
This feature is time saver when you have to edit multiple Items at once. You can select multiple Items at once and perform various bulk actions on them. You can Edit, Delete and Move selected contents to another project easily.
You can select Items by:
- Selecting all visible items by using leftmost checkbox on column header.
- Selecting one particular item by clicking on checkbox of that particular row
When you select more than one Item, a blue bar button will appear in the middle under main navigation menu. Clicking on it will open the Bulk Edit sidebar.
9. Search and Filters
When you have a lot of data, it becomes harder to find your desired Item. To facilitate you, Yodiz offers the ability to apply search and filters on entire Backlog Board. Searches can be performed on various criteria such as Item ID, Tag or Title as well as Responsible and Creator. Click on Apply Filter after filling in your criteria and you will be shown the relevant results.
Find more details of performing Searches and Filters
10. Swimlanes
You can use Swimlanes to view items, grouped with the certain similarity. Bulk Edit is also possible on such grouped items. Four types of swimlanes are provided for backlog: Responsible, Release, Epic User Story, and Priority. Additionally, a dropdown custom field can also be added as a swimlane category. To use such custom field, associate it with an item screen. Learn more about Swimlanes.
11. Activity feed And Settings
Right Navigation Panel on Backlog board provides multiple quickly accessible functionalities.
11.1 Analyze Project Progress
To Plan and prioritize your Backlog items becomes easier when you have current visual current statistics of your Backlog. Click on Analysis option of right navigation menu to get your Backlog in the most valuable and used graphs. Learn more about Backlog Analytics.
11.2 Activity Feed
Keeping track of the Backlog becomes very convenient with the Activities Tab. It is accessible from the right navigation panel and provides constant updates regarding all Items in Backlog. The most recent activities are shown at the top and you can even filter your Activity Feeds via the filter icon provided at the top right under Activities Tab. Export of feeds in *.pdf is also supported now.
Learn, how to set activity feeds11.3 Settings
No need to go anywhere in order to find Board settings because Backlog settings can be accessed from the Right Navigation Panel on Backlog Board. The settings tab provides you option to open and edit Project Settings and allows you to export your Backlog data in multiple formats.
Export Backlog:Export is one of the prominent features of Yodiz Backlog. You can export your entire Backlog data in in various formats like CSV, JSON, XML and Excel. You can uncheck the columns that you do not want to export. Learn How do I export my Backlog?
12. Item Inline Details
To look at details of your Backlog items, you can add columns by using Columns drop down on top right side of the board. Following is the list of some of the most used columns by Yodiz users.

12.1 Identify Dependencies
Dependencies indicate the reliance of current Item on other Items. You can check the dependencies of Items in the Backlog by clicking on the dependencies icon provided next to Story Points column for each Item.
12.2 Follow an Item Progress
Followers get to know every update regarding an Item if they choose to follow it. It makes keeping track of the Item easier without directly being the stakeholder of Item. You can start following a backlog item or check the Users following the Item by clicking on the Followers icon.
12.3 Access Attachments
You can directly check out the attachments associated with Item in Backlog by clicking on the provided attachments icon.12.4 Associated Tasks and Issues
Backlog mainly shows the User Story in list view but you can add and view existing associated Tasks and Issues by clicking on the icon provided next to Issue and Tasks column for each User Story.
12.5 Comments
Comments are useful if you need to discuss something with your team or add something to the Item. Comments associated with Items in Backlog can be added and viewed from the comments icon provided in the contextual menu features.
Main features of the Backlog have been covered in the above help article, but if you still feel like having questions, check out our frequently asked questions section below:
FAQs (Frequently Asked Questions)
-
My User Story is at the bottom of Backlog, how do I move it to top?
User Stories in the Backlog can easily be dragged and dropped vertically to “change the position sequence or star priority” of User Stories in Backlog. The User Stories with higher Star Priority will automatically be shown at the top of list.
Note: If more than one User Story has five star priority, they can be identified by the sequential number priority the the left side but will still show up in the five star priority grouping of User Stories shown at the top.
Multiple Items can also be dragged and dropped by selecting them via the checkbox provided at the left side of every Item in Backlog. The other way is to change the editable User Story position number provided at the left of each User Story in Backlog.
-
Where can I find the filter I saved?
In Backlog Board, you can find your saved filter by clicking on left navigation panel.
Tip: If you have more ambiguities, check the Search and Filter detailed article.
-
Is there a quick and easy way to see which user made changes in the Backlog?
Backlog Board provides you updates of all the activities and updates via the Activity Tab provided in the right navigation panel.
-
How can I add a column on Backlog Board?
Both System and Custom Fields can be added as a separate column in your Backlog Board. To add or remove a column on board, click on Columns drop down under Navigation menu and mark the required fields. List of supported System fields on Backlog includes:
- Epic
- Sprint ,Sprint Start Date, Sprint End Date
- Release, Release Start Date, Release End Date
- Component
- Due Date
- Updated By, Updated On
- Created By, Created On
- Task/Issue Effort – Estimate, Remaining and Logged
- Comments
- Tasks
- Issues
- Attachments
- Followers
- Dependency
Note: To add a custom field as a column, remember to add this field in your project item type screen as well.
-
I only see built-in columns, I want to see my custom fields as columns, can I?
Custom fields can be made visible in “Backlog” as Column. You can add custom fields associated with User Story in “Backlog”.
In “Backlog”, you can add new columns using “Column” button in Filter bar. “Columns” drop down shows all available fields including custom fields. Values are comma separated, if your selected custom field has multiple values.
Although, it is possible to add new status in some boards. For details, see What is status set? and How to create a Status Set?
-
How do I export my backlog?
In order to export your Backlog, click on the far right Settings
 icon in backlog view, select Export as CSV.
Note: Only loaded data will be exported. In order to export entire data make sure everything is visible.
Tip: In order to only export selected items, use the filter functionality.
-
What contents gets exported when I export my backlog?
Few built in field values are by default selected, that include Position, Title and ID. However, you can export all the contents of your Backlog including Custom Fields created by Users. You can select your desired fields for exporting CSV of Backlog.
-
In which formats can I export backlog contents?
You can export your Backlog contents in CSV format only. Although, Sprint, Issues and Release board contents can be exported in CSV, XML, XCL or JSON.
-
How do I export only selected User Stories?
If you want to export only desired User Stories, you need to filter your data and click on the far right “Settings icon > Export as CSV”. Export will take only data that is loaded on Board at the time of export.
-
What is the Cumulative Flow Diagram and How can I know bottlenecks of my Project?
The Cumulative Flow Diagram(CFD) is fundamental tool to visualize project progress and helps to spot potential problems. By using CFD, you can track status of work items for a defined period of time. Usually, a steep rise or drop in a graph indicates that there is a problem.
Agile teams get benefit from it, by analysing the problem before it becomes bottleneck of the project success.
By looking at the chart, you can instantly tell that Project: All Teams progress has been quite good as “Orange line” indicates that how many items are Done but the “Blue line” is also increasing steadily with time, which indicates that Project contents are not finalized and constant increase of ToDo items shown as “Red line”, is the problem to finish this project. Another important factor to consider is Team velocity by checking, how many items are “In Progress” as compared to newly added ones.
img>>You can learn more about How to use the cumulative flow diagram?
-
Can I view user stories from multiple projects in one Backlog?
Backlog shows User Stories from single project. There is no option to view User Stories from multiple projects in single Backlog.
-
What happens when user story is linked to sprint, will it disappear from Backlog?
When a user story gets associated to a sprint or release, it is shown differently in Backlog. Before association, it is shown under Unscheduled items category. After association, it is shown under “In Sprints” category of Backlog board Filter menu.
-
How do I switch my project at Backlog?
There is a project drop-down provided just below the top navigation menu. Select the project of your choice from the dropdown to view the associated User Stories.
-
How can I move User Stories to another project, using Backlog board?
Yes, you can. Select the desired User Stories in the Backlog and a “Bulk Action” button will appear in Filter Bar. In the Bulk Action dropdown, you can find an option “Move to Other Project”, select the desired project and the selected User Stories will be moved to the desired project.
-
Do I see activity feeds entries, if I use bulk-edit options?
There is no activity feed notification for Bulk edit at the moment.
-
I can not see any Bulk Edit option, how i can activate it?
Bulk Edit drop down appears under main navigation menu, only when you select atleast one item on the board.
-
Bulk Edit is available on which Yodiz boards?
Bulk Edit is only provided for: Issue Tracker, and Backlog
-
How can I set activity feed notifications?
You can change your activity feed settings on issue, user story and task level:
Go to “Navigation Menu > Name Avatar > Profile Settings > Notifications > Application Notifications”
Quick Tour Guide
Yodiz is designed to be user friendly but we understand that because of multiple features, you might need guidance at some point. That’s why when you land on any page, you will find a small information ![]() icon at the right bottom. Clicking on it will provide you all the necessary information about the board and how to work with it.
icon at the right bottom. Clicking on it will provide you all the necessary information about the board and how to work with it.
Do you have anything to tell us? Reach us anytime at Support@yodiz.com.